Practical example: un-watermarking raws from Spowiki
Jul-2020
Here is the link to download the watermark manipulation kit:
https://www.mediafire.com/folder/qkxpmudgvszm4/ReleaseThatWatermark!
You may already have seen this ugly watermark:

First, let’s reconstruct the watermark as a translucent PNG image. We need to skim the raws to find it on two different uniform backgrounds, for example black and white:


Let’s name the first file WhiteWatermark.png and the second one BlackWatermark.png
We’ll put both files in a folder, as wells as the program WatermarkTwoSampleExtractor.exe and its configuration file ConfigurationWatermarkExtractor.txt
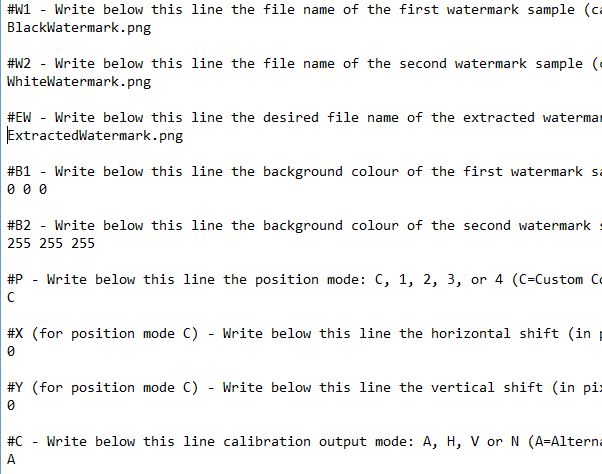
Then, we’ll edit the configuration file with Windos notepad and save it. The configuration will look like this:

Then, we can run the executable WatermarkTwoSampleExtractor.exe and see the reconstructed watermark.
But if you look closely, then you’ll see that something went wrong.

Since the watermark is not at the same position in the two images, there was a misalignment in the reconstruction process.
It’s easier to see it on the second image created, the “calibration image”:

Since both images used the full width of the raws’ page, there is only the vertical alignment to fix. Let’s switch to vertical calibration mode in the configuration file and run the program again. Here’s the new calibration image:

If we try different values for the vertical position, the alignment looks much better for Y = 41 pixels:

And the reconstructed watermark is good now:

Now, let us try to un-watermark a manhua page for real:

The image is named 01.jpg and the reconstructed watermark file is named ExtractedWatermark2.png
We’ll put both files in a folder, as well as the executable WatermarkRemover.exe and the configuration file ConfigurationWatermarkRemover.txt
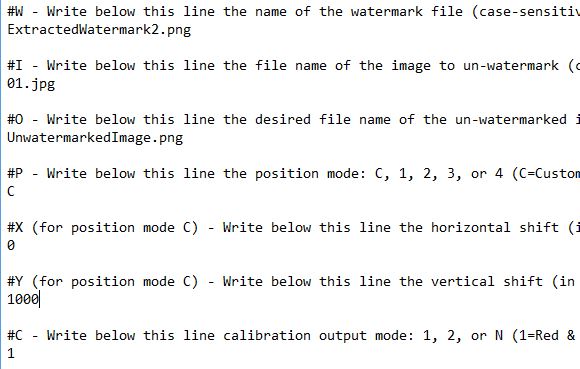
Then, let’s edit the configuration file. It will look like something like this:

When we save it and run the program, we once again stumble upon the correct position to find. Sometimes, the un-watermarked area is directly visible on the output image, but sometimes we’ll need the calibration image to see it.

Here is the final result, with Y=2090
